Monday, July 30, 2012

Barnwood Console Table

As I mentioned in a previous post my brother and I had several projects going at one time.  One of those projects that I was most excited about was a barn wood console table.

 I had pinned the inspiration tables which you can see here:  Restoration Hardware Balustrade Salvaged Wood Console Table and here Horchow Jameson Console.

First I knew I did not want my console table as large as the inspiration tables.  We decided on the dimensions of 4ft. long x 1ft. wide x 30in. tall.  I then picked out the pieces of barn wood that had the best combination of weathering.  Once all that was decided my brother went to work framing.  He soon realized barn wood is not the easiest wood to work with.  


I had a box of posts left over from a porch project we did a few years ago.  I thought they would bring the perfect combination of rustic elegance to this table.


Sorry there are not any pictures of the top construction.  He got so involved trying to piece barn wood together into a level surface he forgot to stop and take pictures along the way. (That or he didn't want to)  During this phase of the construction, I sort of made myself scarce.  There was a lot of trial and error going on trying to get the top the exact way he wanted it.  I did not want to bear the brunt of his frustrations.  Finally after a whole afternoon and the next morning he finally got it to his satisfaction.


 I couldn't have been more thrilled with the final results.  It was way better than I expected.  Thanks, Wes.  I thought I would like the two tone effect of the three cross pieces of wood on the top and the posts compared to the barn wood, but I decided I wanted a more even tone.  So I decided to try the weathering concoction I had pinned of coffee grounds, steel wool and vinegar.  You can read about it here:  DIY Vintage Wood Stain courtesy of Home Heart Craft


The finished product weathered and merchandised.  I absolutely love how it turned out.  I am so excited to take it to my booth at the Gas Lamp Antiques and Decorating Mall in Nashville on Wednesday when I get to start setting up.


Join the Party @
Friday, July 27, 2012

Lamp Shade Bird Feeder

Today's post is going to be short and sweet.  I am going to two estate sales.  I was going through some storage tubs sorting items to take to my new booth at The Gaslamp Antique Mall in Nashville.  I came across some gorgeous glass lamp shades I have had forever.  My brother and I started brainstorming what to do with them, when I remembered seeing some made into a hanging bird feeder.  So, off to Lowes we went to get all the necessary parts.


Here's what we came up with, all it took was six eye hook screws, six washers, six acorn nuts, some chain and two clip hangers.  The whole project took less that 15 minutes.  You can also see my wisteria climbing around the fence, reaching all the way to the shepherd's hook.  I just planted it this year, I can't wait until next year when it starts blooming.  It was a cutting from my mom's huge wisteria.


Luckily, I had the type of glass shades that had three holes for attaching to the ceiling fixture. We put an eye hook screws through each hole. We measured the chain into three equal lengths, put the chain through the eye hook, gathered them together onto the hanging clip.


You can see here where we attached the acorn nut to the end of the eye hook screws.


Unfortunately, whatever attracts birds also attracts Gracie Kat.  I have never seen her hurt a bird, I think she just acts mean but is really a big softie.  She has to keep up her image you know. 


About the only plants thriving around here with the heat is the moss rose and the petunias.  My mom loved both of these.  She said they just bloom their little butts off.


Thursday, July 26, 2012

Candlestick Table Had A Mind of It's Own

Have you ever had a piece of furniture tell you how it wanted to be restored?  I know, sounds nuts doesn't it?  Well I had just such an experience with this little candlestick table I have had in storage for years.  I think it had been passed around the family before I ended up with it.  


 Here it is before I started working on it.  I had decided to paint it with some ASCP, wax it and distress it.  Then stencil No. 3 on it representing the 3 people in our family.  Well the top was wobbly and it looked like someone had scraped off a few layers of paint and then painted over it without sanding.  So I decided to take the top of and give it a really good sanding trying to even out the worst of the previous paint jobs.  I know ASCP is very leveling but this was really bad.  I repaired the wobble and started sanding it. 


As I was sanding a funny thing happened, I was starting to like the look of the layers of paint.  The top layer was a light beige, the next layer was light blue, the next yellow ochre, then white.  When I finished sanding/distressing it I knew I couldn't bring myself to paint over it.  I started thinking about how it really represented all our family members and their decorating styles thru the years.  So I just waxed it and considered it finished.  It now displays beach items from our last trip to Florida with my mom in a corner of my guest bathroom. 


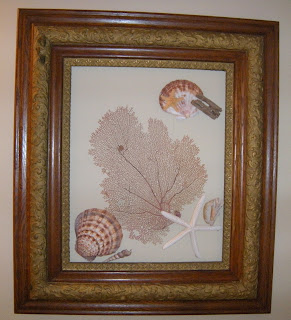
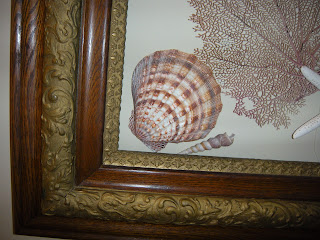
I had some leftover shells, fans and starfish so I decided to create a framed arrangement to hang over the toilet.  I can't take credit for this idea I saw it in a magazine.  I can't remember which one or I would credit them.  I remembered they hung an old glassless frame and then made an arrangement of items, which they attached directly to the wall.  I used those scrap booking dots.


I think it turned out really nice.  


Wednesday, July 25, 2012

I HAVE A BOOTH

I signed paperwork and plunked down rent on a booth yesterday at the Gaslamp Antique and Decorating Mall http://www.gaslampantiques.com/  in Nashville.  I had a booth at the I-24 Antique Mall in Metropolis, IL.  http://i-24antiquemall-wineoutlet.com/

Here are some pictures of my my booth in Illinois.


  My mom maintained it and I supplied it.  When my mom passed away last November I knew I would have to relocate somewhere closer.  I did not realize it would be so hard to find an opening.  I contacted all the area antique malls only to be told I could put my name on a long waiting list.  Finally I heard the Gaslamp Antique and Decorating Mall in Nashville was expanding and had a few available booths. 

Yesterday after I finished the paperwork I decided to browse (snoop) around the other dealers booths.  I was very pleased with the quality and the creativity of the merchandise.  I will be in very good company.  If you are planning a trip to Nashville anytime soon I so suggest stopping by and checking out this mall, it won't disappoint.  It is located right off of I-65  at 100 Powell Place, Suite #200 Nashville, TN  37204.  Their phone number is 615-297-2224.

Here is just a sample of some of the very inspiring booths.


I then went to the new location just around the corner to view my booth space.  I love my space.  I can't believe with just a few booths left to choose from I got such a great location.  It is almost exactly where I would want to be if I had first choice.  Lucky me!


I know it doesn't look like much now but give me a couple of weeks.  I am so excited to work with a blank area.  I have so many ideas it is going to be hard to decide which direction to go with the decorating.  I get to start moving in August 1st and they are planning a grand opening around the 15th.  Hope to see you there.