Monday, August 20, 2012

Booth

I am ecstatic and exhausted at the same time.  I finally have my booth up and running at the Gaslamp Too Antique Mall in Nashville.  We received word last Wednesday we could start setting up.  Of course, my Thursday afternoon was full with parent orientation at my daughter's school.  Then Friday afternoon was her belt testing at Tae Kwon Do, so I could only get a couple of hours of work in before I had to be back in Murfreesboro.  It wasn't until Saturday I was able to really get to work on it.  Needless to say, I feel like I have lived there for the past three days, but it is ready.  They are hoping to have the doors open for business on Wednesday the 22nd, but there hasn't been any confirmation yet. 

Here are some pictures of the set-up.  I know it looks a little crowded, but I was so anxious to get my house back to normal, I took everything I had accumulated and crammed it in there. 

Before

After

Before


  After

My tastes are very eclectic, I buy what I like thinking that if it doesn't sell I will keep it and find somewhere to use it my home.


Now I am in a panic about the two barn sales I have coming up in September and October.  I am a vendor at the Bella Rustica Barn Sale on Friday, Saturday and Sunday September 28th thru 30th at the Milky Way Farm in Pulaski, TN.  Also, I will be a vendor at the Hayloft at Port Royal Barn Sale on Friday, Saturday and Sunday October, 19th thru 21th in Clarksville, TN.  

Monday, August 13, 2012

Southern Homes Prints

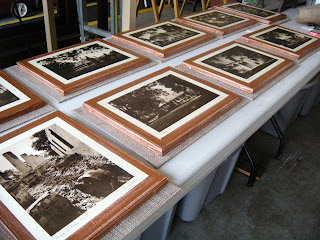
I have been working on this project for quite awhile.  It is finally finished.  I have had these sepia tone prints of old southern homes for probably 10 years. Every time I started to put them up for sell something held me back.  Somewhere in the back of my mind I knew I would have the perfect idea and place for them.  I finally did, my master bedroom.  As you can see, I have a huge expanse of trimmed out wall behind the bed.  


I started with ten 11x14x1 canvas.  I painted them with the same paint I used on the wall, American Signature Cowboy Suede.  I then distressed them with sandpaper.


I measured and marked the placement for the each print.


I brushed each painted canvas with mod podge, placed the print, and modge podged over each again.


 Here are all ten, waiting for the mod podge to dry.


In the meantime I measured ten 14x18 pieces of burlap and spray glued them to ten 12x16 flat canvas. After the mod podge had dried, I stapled each print canvas to a burlap canvas.


Mr. R helped me hang the long (120") curtain rod.  I used strips of burlap looped and stapled to the back of the canvas and hung them from the curtain rod.


The two end pairs where vertical prints and the remaining six where horizontal prints.


I think they fill up the area and make a statement in the room.  


The master bedroom is finally coming together.  When I finish the other side of the room I will do a total reveal post.


Wednesday, August 8, 2012

Family Room Curtains Dilemma

Here was my dilemma!  My family room windows have wonderful woodwork that my husband refused to let me cover with curtains.  I felt they looked bare and unfinished, so what is a girl to do?  Why I go on pinterest of course and look for inspiration for a solution.  Here was what I found:  Curtain Creativity via From My Front Porch To Yours


I thought this would be the perfect solution.  They were simple but elegant, they had a  monogram (which I love) and they would not cover any of the woodwork.  Also, here is the amazing part, I remember seeing a curtain similar at K-mart, yes K-mart!  So I dashed off to K-mart as fast I could keeping my fingers crossed that the curtains were how I remembered them.  When I found them I was pleasantly surprised, I loved the linen like look of the material and the color was perfect.


Next, the stencil, I already had the fabric paint and brush, but I had to cut out my own stencil.  I decided I just wanted our last name monogram.  I ironed and hung the curtains first to mark exactly where I wanted to position the 'R'. 


I allowed the fabric paint to dry for a couple of hours before I hung them because I knew I would have to tie them up and work with them a little to get them just right.


In the meantime I had to cut down and hang some wooden curtain rods I already had. 


Here is the finished product, I know it was a success when Mr. R noticed and complimented them.  I love that the linen like material lets light thru.


The inspiration window and curtain does not have a blind.  Now, my dilemma is whether or not to remove the blinds.  


Join The Party @

Thursday, August 2, 2012

Metal Urn Lamp

Last week at my local goodwill store I came across this gorgeous metal urn lamp.  It was painted an awful yellow with gold details.  It was dinged, chipped and the cord was frayed.  Sorry, I don't have any before pictures, because my brother itching to do something one morning started stripping it.  He stripped it down to the bare metal, sanded it, and replaced the cord all before I knew what was happening.  His hands are never idle for very long.  I knew at this point I needed to be quick with the camera when he was around.  Here are the pictures after I sprayed it with primer and zinc paint.


Now comes the hard part and elbow grease.  I rubbed and rubbed with steel wool until I took the zinc paint off down to the primer, distressing it and making it look worn.


 Here is the close-up of the scroll detailed handles.


 Here is the pedestal base.


Of course I couldn't wait to start merchandising it.  I had the perfect French shade for it.  I knew it would look beautiful on the barn wood console table we had just completed. You can read about it here:  Barnwood Console Table


I absolutely love how it turned out.  The patina makes it look like it has been handed down through generations and well loved.


Join The Party @